Quick jump |
ASPRunnerPro comes with an ability to create custom edit control plugins. In this article, we are going to show you how to create ColorPicker and SignaturePad plugins.
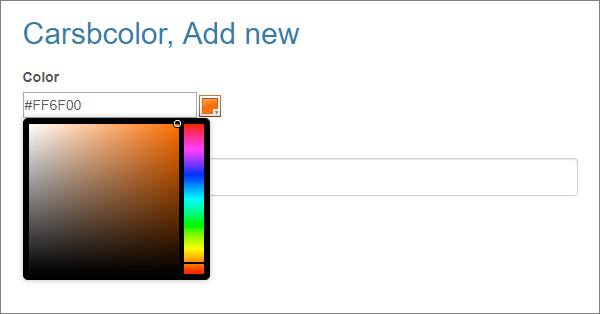
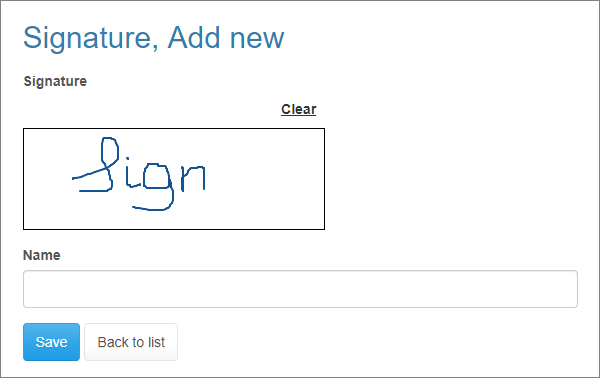
The ColorPicker and SignaturePad edit controls as seen in the browser:
Let's say we want to add a color picker control that allows users to select colors similarly to Adobe Photoshop. Since our software comes bundled with jQuery, let's search the web for "jQuery colorpicker".
This search returns several results, and the one we are going to use is miniColors. It looks nice and is easy to integrate. Sources can be found at Github.
•create a new folder under <Documents>\ASPRunnerProPlugins\edit named ColorPicker;
•copy files EditMyField.js and EditMyField.asp from MyField folder to the ColorPicker folder;
•rename those files to EditColorPicker.js and EditColorPicker.asp, respectively;
•if your plugin needs extra files, copy them to the ColorPicker folder while keeping the folder structure;
•open EditColorPicker.js in any text editor and replace all occurrences of EditMyField with EditColorPicker. Do the same with the EditColorPicker.asp file.
•use the addJSFiles() function in EditColorPicker.asp to add references to external JavaScript files:
this.pageObject.AddJSFile_p1 "jquery.miniColors.min.js"
Note: you may need to specify the loading order of JavaScript files. In this example file, second.js is loaded after first.js:
this.pageObject.AddJSFile_p2 "second.js", "first.js"
•use addCSSFiles() function to add CSS files:
this.pageObject.AddCSSFile_p1 "jquery.miniColors.css"
In the EditColorPicker.asp file find the buildUserControl() function. This is were you build HTML code for your control.
If you leave the predefined code as is, it will display a simple text edit box. You can change this edit box, for example, by using a black theme:
class="black"
Lets see how to turn this edit box into a colorpicker control. According to colorpicker instructions we need to call for miniColors JavaScript referencing the edit box. We can do so adding the following code to constructor function:
$("#"+this.valContId).miniColors({
letterCase: 'uppercase'
});
The letterCase option tells the control to convert the manually entered color values to the upper case. this.valContId is the id of the control.
This is it; the control is ready. You can now launch ASPRunnerPro and select the ColorPicker as Edit as type for any text field.
1. It would be nice if instead of the hex color value, we could show the visual representation of the selected color on the List/View pages. We can do so by choosing the View as type as Custom and adding the following code there:
strValue="<span style='padding: 5px; background: " & strValue & "'>" & strValue & "</span>"
2. By default, ASPRunnerPro sets focus on the first edit control when an Add or Edit page is loaded. This may not be a desired behavior for the ColorPicker control, as the popup window will open every time the page is loaded. To prevent this from happening, implement the setFocus function, and return "false" every time.
Note: If you need to change the control behavior, check the functions and events in the source\include\common\runnerJS\Control.js file.
The SignaturePad plugin allows adding a signature pad to your forms. SignaturePad works with both mouse and touch devices. We use a SignaturePad jQuery plugin that comes with excellent documentation and examples.
The basic setup is the same: create new folder for the SignaturePad plugin, copy and rename files, add files that plugin needs to the plugin directory.
This plugin is a bit more complicated and takes a few extra steps to integrate.
1. Build the HTML code
Here is how to do this in the buildUserControl() function:
dim str
str = "
<div class='sigPad' style='width: " & CStr(this.settings("width")+2) & "px;'>" & _
"
<ul class='sigNav'>" & _
"
<li class='clearButton'><a href='#clear'>Clear</a></li>
" & _
"</ul>
" & _
"
<div class='sig sigWrapper'>" & _
"
<div class='typed'></div>
" & _
"<canvas class='pad' width='" & this.settings("width") & "' height='" & this.settings("height") & "'></canvas>" & _
"
<input id='" & this.cfield & "' type='hidden' " & _
"name='" & this.cfield & "' class='output'>" & _
"</div>
</div>
"
ResponseWrite str
2. Convert signature data to image
The signature data is recorded in a JSON format as a sequence of lines and is passed to the web server this way. We need to convert the JSON data to a PNG file and save it in the files folder on the web server.
Luckily all the hard work was already done, and all we need to do is to add a few lines of code to the readWebValue() function:
this_object.getPostValueAndType
if bValue(FieldSubmitted((CSmartStr(this_object.goodFieldName) & "_") & CSmartStr(this_object.id))) then
doClassAssignment this_object,"webValue",prepare_for_db(this_object.field,this_object.webValue,this_object.webType,"","")
else
this_object.webValue = false
end if
if Left(this_object.webValue,Len("data:image/png;base64,"))="data:image/png;base64," then
this_object.webValue = Mid(this_object.webValue, Len("data:image/png;base64,")+1)
end if
filename = generatePassword(15)
var = Base64Decode(this_object.webValue)
runner_save_file CSmartStr(getabspath(this_object.settings("folder"))) & "\" & filename & ".png" , var
set result=CreateDictionary()
set result1 = CreateDictionary()
setArrElement result,"name",this_object.settings("folder") & "/" & filename & ".png"
setArrElement result,"usrName","signature.png"
setArrElement result,"size",LenB(var)
setArrElement result,"type","image/png"
setArrElement result,"searchStr","signature.png" & ":sStrEnd"
set result1(0) = result
this_object.webValue = my_json_encode(result1)
if not (IsFalse(this_object.webValue)) then
setArrElement avalues,this_object.field,this_object.webValue
end if
Note: You can read more info about the JSON to image conversion here.
Note the way the file info is stored in the database. Since this version offers multiple files to upload, we need to be able to store more info than just the file name.
Besides the file name itself, we also save the file size, file type, and the path to the file in the JSON format. Here is how a typical file upload field looks like in the database:
[{"name":"files\/h8hsoz5hd23b0ik.jpg", "usrName":"Chrysanthemum.jpg", "size":879394,"type":"image\/jpeg", "searchStr":"Chrysanthemum.jpg:sStrEnd"},
{"name":"files\/2p85jz854o6fbv8.jpg", "usrName":"Desert.jpg","size":845941, "type":"image\/jpeg", "searchStr":"Desert.jpg:sStrEnd"},
{"name":"files\/pm4fu8uv2u6xc1w.jpg", "usrName":"Hydrangeas.jpg", "size":595284,"type":"image\/jpeg", "searchStr":"Hydrangeas.jpg:sStrEnd"}]
Now we can customize our plugin. Users may need to change the appearance and behavior of the signature pad, for example:
•change the width and height of the signature pad;
•change the background color;
•change the folder where the image files are stored;
•make the signature pad field required.
As the first step, we need to learn to pass the settings from the ASPRunnerPro wizard to the plugin. Proceed to the Edit as dialog in ASPRunnerPro and click the Add initialization script button. Here is a sample set of settings for the SignaturePad control:
' signature field height
this_object.settings("height") = 100
' signature field width
this_object.settings("width") = 300
' signature background color
this_object.settings("bgcolor") = "#FFFFFF"
' set it to true to make signature field required
this_object.settings("required")=false
' folder to store signature files
this_object.settings("folder")="files"
This code is self-descriptive; you can pass any number of settings there. If you create a custom edit control plugin, place the sample initialization script to the sample.asp file that needs to be located in the plugin folder.
Now we can access those settings in the plugin initUserControl() function. We can also pass the settings to the JavaScript part of the plugin.
this.addJSSetting_p2 "required", this.settings("required")
Making the signature field required
In the JavaScript init() function, add the following code:
if (this.required)
this.addValidation("IsRequired");
The signature is not required by default. To make it required, add the following line of code to the initialization script under Edit as properties:
this_object.settings("required")=true
Setting the width and height of the signature pad
Passing the width and height from the Edit as settings in ASPRunnerPro:
this_object.settings("height") = 100
this_object.settings("width") = 300
Then we can use this.settings("width") and this.settings("height") in the buildUserControl() function to specify the width and height of our control:
<canvas class='pad' width='" & this.settings("width") & "' height='" & this.settings("height") & "'></canvas>
Changing the folder where the signature images are stored
Passing the folder name from the Edit as settings in ASPRunnerPro:
this_object.settings("folder")="files"
Using this variable in the readWebValue() function:
filename = generatePassword(15)
var = Base64Decode(this_object.webValue)
runner_save_file CSmartStr(getabspath(this_object.settings("folder"))) & "\" & filename & ".png" , var
Changing the signature pad background color
Passing the background color from the Edit as settings in ASPRunnerPro:
this_object.settings("bgcolor") = "#FFFFFF"
The bgcolor contains the color value, #FFFFFF is a hex representation of white color.
Now we can use this.bgColor in the JavaScript control constructor function to pass the background color to the SignaturePad control:
$('.sigPad').signaturePad({drawOnly:true, bgColour: this.bgColor});
This is it. As you can see, creating a custom edit control plugin is relatively easy. You can do it with a few lines of code.
If you develop a new edit control plugin and want to share it with other users, feel free to contact our support team.
We have a plugin marketplace where you can sell the plugins you have created.
See also:
•JavaScript API: Control object > addValidation()
•JavaScript API: Control object > add CSS Class
•"Edit as" settings: ColorPicker
•"Edit as" settings: SignaturePad